
SCREEN PRINTING PROCESS
After the quality of the image to be printed is prepared, then we start to expose and prep the screens. Click here for information on how the image has to be give to us, to avoid additional charges.
 FILM OUTPUT


A translucent film is to be made. A film is outputed per color,and size.
Two kinds of printers are available : inkjet and laser. The best film output is from an injket. The film used is clear and the ink on it is dark black. The Laser film being used is not clear but slightly opague. The ink on the film is key in preparing and exposing the screens.
 FILM REGISTRATION FOR SCREENPRINT

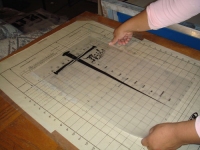
The translucent film is then registered on a table, where the film is centered on a diagram.
The diagram is used to center the film and the screen.
The outline of the diamgram is the same size of the inner part of the screen. When the film is finally place where need be the screen is then place on top of the film.
 MARK THE SCREEN

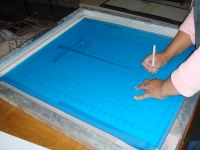
The screen is then marked with a felt pen for postioning the translucent film back underneath the screen when taken to the light unit.
The "Blue STUFF" you see is call emulsion, it has the same Consistency as Elmer's Glue and must be kept away from UV light.
LIGHT BOX - EXPOSING THE SCREENS - CREATING STENCILS


The light box is then open. The lid of the light box is made out of a rubber material similar to a wet suit. This will help later.
The film is then placed on the glass in the light box like in the center picture. The black part of the translucent film is going to protect the emulsion or "Blue STUFF" from curing. The screen is dry but not cured... We will explain later.
The screen is place on top of the film again, but this time in the light unit. The film has registration marks and the screen has the marks that we place earlier with the diagram.
The exposing unit or the "light box" subjects the emulsion ("BLUE STUFF" on the screen) to high levels of UV light for a short period of time.


Closing the Light Box to Start its Cycle.
To the left you can see the rubber material that we talked about earlier. The exposure unit tightly hugs the screen with a suction. This helps the film and the screen from moving and keeps it tightly close together for better exposure.
To the right you see the UV light on the edge. You can also see the clamps that hold the cover tight to keep its suction. If the suction is lost or not met to the correct compression, the light box will not turn on.


After the LIGHT
After the exposing unit has completed, the emulsion will harden and cure. The emulsion that was not expose to the light and was covered by the film will not harden and wash away with water leaving a stencil of the design that was on the film.
A seperate screen is made for every color in the design


Washing the emulsion away.
Time to wash out the image. The stencil is now to be made. Now whatever was on the film in black will wash away in the washout sink. The emulsion will work like a stencil. All the emulsion will stay except for the design. This process will take a few minutes. Most wash out sinks have a back light. The back light is used to see if there is any part of the design that needs to be properly washed out. To much time in the water and all the emulsion starts sliding off of the screen.


One color jobs are simple to register, but multiple colors can take a few hours to prepare from computer to the first print.
The completed screens are then fitted into the press. A system of clamps and screws allows for very minute adjustments to the position of the screen. If the design features only one color, then the screen must simply be straight; if there are two or more colors, the design must be registered, or lined up perfectly. Screens are generally made with cross-hair registration marks to aid in this process.